Showing posts with label depth of field. Show all posts

Thursday, June 21, 2012

Love is in the air.....Proposal!

     Words can't express how I felt when Chris asked me to photograph him proposing to Lauren.  First of all, Anne and I had not had the opportunity to shoot a proposal yet, and were excited to know the couple that would be our first.  Lauren is one of my best friends, and I have known her since kindergarten!  Chris and I conspired for months before the actual proposal date about the details of the shoot, and Lauren was none the wiser.   I have to give credit to Chris for the majority of the planning, he thought out a proposal that all women deserve.  It was personalized and memorable.  The hardest part was trying to figure out a special place that would not signal anything to Lauren.  The place that was chosen was in an arboretum on Long Island.


Chris, Anne, and I made our way to the Arboretum to check it out about a month before the big day, in complete secrecy.  We spent awhile wandering around the arboretum testing out the different locations.  There were many beautiful spots in the gardens and throughout the grounds.  Chris chose, with some help from us, a nice secluded location underneath a tree with pink flowers by a bench (sadly the flowers were gone by the time the big day came but it was still beautiful).  All we had left was to wait until the big day!   I knew Chris was excited for the big day to come, but I did not know how impatient and nervous he would get.  I received text messages everyday from Chris counting down the days,  and of course checking the weather to make sure no rain was coming.  The week before the weather was back and forth and it seemed like it could possibly rain on that day.  All we could do was hope for the weather to hold.


Finally, the day arrived!  We made sure that no one knew that I was even going to be in town with Anne.  I even texted Lauren complaining about how busy it was at the ariport that I work at on Nantucket.  Anne and I went to the arboretum early to assess the location and find our hiding spots...and we may or may not have played around for a bit coming up with ridiculous hiding spots that would never work!  We received some odd looks by passersby, but what did we care?  We were getting ready for an amazing shoot.  Then... my phone vibrates... and its a text from Chris, "We are at the bathrooms." (meaning they were about to start the walk into the area).


  I think I was just as nervous as Chris was because I wanted to make sure we did not miss a second of the proposal.  We sat in wait as they strolled around the arboretum, and then took cover for our covert operation as soon as they got close.  We were holding our breath, and our adrenaline was pumping!  Then we see them coming towards us.  They stop.  He has Lauren take a picture of the tree they are under to distract her, and then he drops down onto his knee!  The shock and excitement is apparent as Lauren starts to shake and her hands go to her face.  Of course she accepts the ring with tears in her eyes and they embrace.


Then after Lauren calms down a bit and grounds herself, she looks around and says, "Who is that over there?"  She found me!  At this point, it didn't really matter, and I was then able to congratulate her right away.  Next, of course, were the obligatory phone calls to family and friends.


After all the phone calls were made, Anne and I asked the newly engaged couple if they were up for a mini engagement shoot so they could have some more photos to commemorate the day.  They said that they would love to, and so we got to have some fun!


Can't wait to shoot the real engagement shoot and to be a part of Lauren and Chris's wedding in October 2013!  We wanted to thank Chris for making us a special part of his big day, we love you both and couldn't be more excited for what's to come.


-Stef

"A photo says, You were happy, and I wanted to catch that.
A photo says, You were so important to me that I put down everything else to come watch."
-Jodi Picoult, My Sister's Keeper

Friday, April 20, 2012

Costa Rica

 Recently I traveled to Costa Rica and I have to say it was amazing!  I spent 3 days in the mountains of Monte Verde, 3 days in Arenal near the volcano and 3 days by the beaches in Guanacaste.  When you are there you will notice Costa Rica is known for its coffee, which I have to say was very very strong! I was way more interested in the animals, plants and views I would be able to photograph.      " The country is home to over 9000 species of flowering plants, over 600 species of butterflies, more than 200 different mammals as well as prehistoric looking reptiles and boldly colored amphibians." (Bartley, Glenn.photo Itinerary- Making the most of Costa Rica: Nature Photographers Online Magazine, 2010 http://www.naturephotographers.net/articles0706/gb0706-1.html)
Fig tree in rainforest

If you are interested in photographing birds, monkeys and beautiful rainforests, Costa Rica is perfect for you!  While vacationing in Costa Rica I felt a main focus on most tours was the birds!!
They have over 875 different species!
Birds

 My advice for shooting here is to definitely bring a long lens! Either if your shooting with a point and shoot or a DSLR, make sure you have a large enough zoom to catch those small animals that hide in the trees.  I would also recommend bringing along a macro lens, which is my favorite, to get those small details. 
Hummingbird nest with eggs (macro lens)

 Remember Costa Rica has a lot of rainforests, so I would recommend bringing a rain cover for your backpack, since you will most likely encounter rain at some point.
Arenal Volcano

Costa Rica has so many different photo opportunities such as mountains, beaches, volcanoes, tropical rainforests, waterfalls and much more.  Plus the sunsets are amazing!! 
Sunset in Monte Verde

I spent 10 days traveling around this beautiful place and just wanted to share some of my photography as well as some tips with all of you. Enjoy!


Stefanie

“Look deep into nature, and then you will understand everything better.”  ~Albert Einstein

Sunday, April 15, 2012

Size Matters.

All jokes aside, yes size really does matter when it comes to lenses.  Lens sizes vary significantly, and they all serve their own purposes.  My go-to lens now is my fixed 50mm.  It allows so much light in and has such a narrow depth of field that I can now shoot handheld indoors with natural light, instead of relying on my flash to fill in the light.  (It also helps that my 5D Mark II has a high ISO allowance.)  My other favorite types of lenses to work with are wide angle pushing towards fisheye.  These ones are around 14mm to 24 mm.  These lenses can help to fit a large group of people into a single image.  Personally, I love the blur and the curves of the lines that are created with these lenses.  But alas I digress, what I really want to talk to you about here are telephoto lenses.  I had the opportunity to "play" with a 400 mm lens the other weekend, and play I did.


I would say that this branch (in the above photo) was at least 20 feet away from me, but with the zoom you get up close and personal.  That is the typical use for a telephoto lens; it cuts out the distance between you and your subject.  But do not let that fool you, just because that is what a telephoto lens is typically used for does not mean you have to use it that way.


With this image, I was definitely not trying to get in close to a subject that I could otherwise not reach.  Instead I was trying to play with the depth of field of this particular zoom lens.  I laid on the ground about 10 feet away, and shot slightly angled up at the flowers.  Because of the angle I chose and the lens that I was using, I produced this image with a very strong focus on the flowers so that they become the absolute focal point of the image.


I like flowers so I figured I may as well throw in another shot! :)


Now with the shot above of the swingset, I was again trying to play with the depth of field.  I have to say that I love the detail in the swing of this image, and that most of the focus is there.  My one issue with this shot is that if I shot it again, I would try and work around the pole crossing the right half of the image.  I am not sure what I would have done with it, but I do find it distracting (clearly not distracting enough that I wouldn't share it though).


For my last image, I used the telephoto lens for it's typical use shooting a bird at the top of a tree at a significant distance.  I changed the feel of this image significantly in post, considering this was shot on a bright sunny day with blue skies.  I love how creepy it turned out!

Anyways, send us any images you had the opportunity to shoot with a telephoto lens!  We would love to take a look and see what other people are up to shooting at lengths!

Anne


"When I have a camera in my hand, I know no fear"-  Alfred Eisenstaedt

Friday, March 2, 2012

I Love Love!

Sorry for the delay in posting this... this month has become quite busy
for many reasons, but I knew I could not just skip writing about Caroline and Mike's engagement session.


Engagement sessions are obviously very different from weddings. The focus is on the couple and how much in love they are, which you would think would be the same for weddings but it is much different. Weddings are riddled with distractions for our couples and their guests; engagement sessions let us see who they are as a couple without those distractions.  And during this engagement session, we were definitely in for a treat with two individuals who love to let their personalities shine!


I have known Caroline pretty much since I was born, and I have always known what a fun and wonderful person she is. I have also known Caroline and Mike as a couple for a few years now. Based on my experiences with them previously, I knew we were in for an interesting photo shoot. They are not your typical couple by any means. Both are artistic, visually and musically, and they love to have fun. And my favorite part was how well their love translated to the images. I love love!


Caroline and Mike chose Yale University in New Haven, CT as the location of their shoot. I, of course, was thrilled about this choice because of the architecture of the campus. We used the architecture to frame various poses, usually starting out with simple poses that somehow always became wonderfully hilarious photographs. Caroline and Mike played off each other perfectly, giving us the simple serious moments while also conspiring with one another to surprise us with their goofy personalities. For example, we asked our couple to just walk along the sidewalk casually holding hands and laughing together. Then we see them whisper something to one another, and all of a sudden they jump up in the air and click their heels. And this scenario happened multiple times! Adorable!


Toward the end of the shoot, the images kept getting more and more hysterical! Especially when Mike spied a wagon on the campus... and decided to pull Caroline around for a few shots... and he may or may not have accidentally tipped the wagon over with Caroline still in it leading to even more hilarious images. After we put away our cameras, we went to go grab coffee and found a tiny alley along the way that lead to another hysterical moment and luckily Stef had her point and shoot with her so that we were able to capture this final image!  Now to prepare to shoot their wedding in November... so excited!!


Do you have any images that clearly show how in love a couple is? Or do you have any hysterical moments captured that you would like to share? Send them to us, we would love to laugh with you!

-Anne


"Photography is a way of feeling, of touching, of loving. What you have caught on film is captured forever... it remembers little things, long after you have forgotten everything." - Aaron Siskind

Friday, February 10, 2012

Wilson-Bishel Engagement Shoot

Jackie and John will be getting married in December at Woodwinds in Branford CT.  So what better way to celebrate their engagement then to take a few engagement pictures.  I left my little island this past weekend and after a short plane ride, and a two and a half hour drive I finally arrived.  The chosen location for the engagement shoot was at Gillette's Castle in East Haddam, Connecticut.  It was here that I met up with my good friend Jackie and her fiance John.  It was great to see Jackie, because it has been awhile since we have been able to get together.  We went to UCONN together, and I have missed her.  When I arrived at Gillette's Castle, I was quickly enchanted by my surroundings.  There was just something about the feel of the park and the old castle that felt familiar to me.   I have always loved old buildings and abandoned places, so this location was definitely a treat for me.


The park was beautiful, it had lots of stone walls, wooden bridges, and a beautiful patio that overlooks the Connecticut River.  Just getting to spend time with this couple for their engagement session showed me how comfortable and in love they are with each other.  From the way that they look at each other, to the way that they make each other laugh.  It was just beautiful.


We walked all over the outside of the castle and down by the woods, discovering new places along the way. It's a fantastic place to shoot with so many beautiful textures.


Jackie and John, your engagement session was so much fun and I just know your wedding day is going to be even better! We cannot wait to share that special day with you!! 

Stef

"In my view you cannot claim to have seen something until you have photographed it." - Emile Zola

Sunday, January 8, 2012

For the Love of Instagram!

    The more I use it, the more I love it!! I finally switched from my b-berry to my IPhone and I love, love, love it!  Then when I started using Instagram... I knew it was meant to be! (It also helps that the quality of the images on the IPhone are phenomenal compared to my last phone, but that's irrelevant!)  I love the square dimension of the images, and the editing capabilities.  The filters and the blur can make a mundane, everyday image just that much more interesting.  I mean how interesting can images be of snacks for a night in watching movies and of zucchini soup boiling away on the stove?:

Movie Night & Zucchini Soup
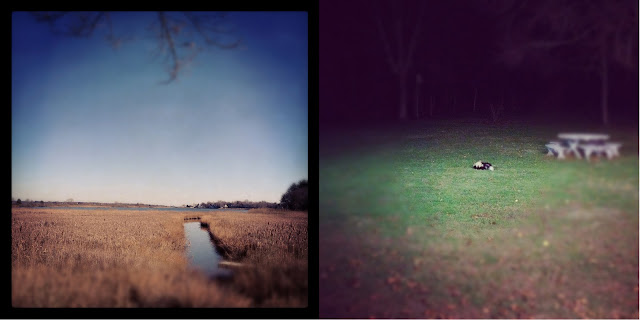
   The blur tool gives you so much control.  Not only can you choose how the blur functions in the image after you shoot, but you can also select the blur before you shoot so you already know how the image will look.  And after shooting, you still have the flexibility to change the blur again.  There are two blur shapes that Instagram uses one is a circular blur and the other is more linear.  The circular blur you can change the size of and move around the screen to pinpoint exactly what you want.  The linear blur can also be expanded  so only the edges are blurred or can be reduced so only a thin sliver is in focus.  The angle of the line can be changed, as well as moved anywhere in the image.  If you want a certain element in focus, you can also just tap the screen so that that part is included.  In the images below, you can see the two different types of blur.  The image of the landscape on the left uses the linear blur along the coastline, and the right image uses the circular blur around the skunk:

Old Saybrook & Backyard Visitor
     And on top of how the blur works, the filters work the same way.  They can be added before shooting the image or after, and with or without frame.  I do wish some of the filters were a little more editable, maybe with more contrast controls.  But that really is being picky... I can always re-edit the image in another editing ap, or load it to my computer and edit it in Photoshop.  By loading these into my computer, I found out something else that makes me very happy.  All of these images are at a quality that I can enlarge them and print them!  I sized the image all the way up to a 30 in x 30 in and there really was not too much damage to the image.  I see some new images being printed for my walls soon!  Especially the bridge on the right of the image below, which I snapped while coming home from Nantucket.  The one on the left was on the way to Nantucket because I had to show people that we did get snow in CT this December.

Snowy Drive & Bridge
    So who else out there loves Instagram?!  Send us some of your images, and we will post our favorites!  And follow me on Instagram... my handle is agattphoto!  (Stef's handle is sburnsphoto.)

Anne


"You don't take a photograph, you make it." - Ansel Adams


Wednesday, January 4, 2012

Macro Photography

Its a New Year, and I hope everyone had a great holiday!

Today, I want to discuss one of my favorite types of photography; Macro.  Whether you are using a macro lens on your DSLR, or are setting your point and shoot camera to Macro, it is a different way to shoot the world and the objects around you.  I tend to use it both in my personal and professional work.  While shooting weddings, I use macro to shoot close details of the bride's accessories. This is an image of the bride's necklace laid on her flowers:

Necklace Detail
Limited depth of field is an important consideration in macro photography.  A limited depth of field means that only the parts of an image in a particular focal plane will be in focus, which can make or break a composition.  This makes it essential to focus on the most important part of the subject, as parts of the subject that are even a millimeter closer or farther from the focal plane will be noticeably out of focus.   This can be seen in an image that I shot in college of water dripping out of a faucet, with a pack of highlighters behind it.  The highlighters are entirely out of focus so that they just become a hint of color, while the water is in clear focus:

Rainbow Water


If you are going to try this with your point and shoot or DSLR with a Macro lens here are a few tips to help:

- If you are shooting with a point and shoot, select Macro mode.  This is generally symbolized with a little flower.

- Using a tripod can be useful.  Keeping your camera still not only improves your shots (getting rid of camera shake), but it also allows you to play around with different settings without losing your composition.

- Using a timer can also help reduce camera shake, so that you do not have to touch the camera when triggering the shutter.


I would love to see some of your examples of macro photography! Please email me at Elegantedgephotography@gmail.com with your examples and I will post my favorites!

Stefanie


"I really believe there are things nobody would see if I didn't photograph them." - Diane Arbus