Wednesday, January 25, 2012

Snow Fall

Nantucket finally saw a little bit of winter a few days ago. As photographers, we brave any weather to capture the emotions and seasonal creations for a photograph. I was able to get an up-close and personal view of snow and now you get to experience it without the frostbitten fingers!! 


 Charlie even came out with me to photograph the snow.  She was a great helper, even though she spent most of the time running around and eating the snow.  


Stef

"There are two people in every photograph: the photographer and the viewer." - Ansel Adams

Sunday, January 8, 2012

For the Love of Instagram!

    The more I use it, the more I love it!! I finally switched from my b-berry to my IPhone and I love, love, love it!  Then when I started using Instagram... I knew it was meant to be! (It also helps that the quality of the images on the IPhone are phenomenal compared to my last phone, but that's irrelevant!)  I love the square dimension of the images, and the editing capabilities.  The filters and the blur can make a mundane, everyday image just that much more interesting.  I mean how interesting can images be of snacks for a night in watching movies and of zucchini soup boiling away on the stove?:

Movie Night & Zucchini Soup
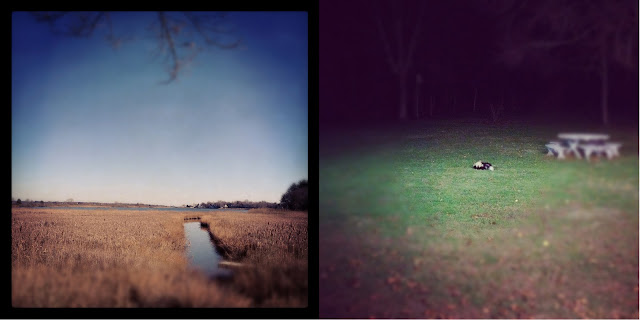
   The blur tool gives you so much control.  Not only can you choose how the blur functions in the image after you shoot, but you can also select the blur before you shoot so you already know how the image will look.  And after shooting, you still have the flexibility to change the blur again.  There are two blur shapes that Instagram uses one is a circular blur and the other is more linear.  The circular blur you can change the size of and move around the screen to pinpoint exactly what you want.  The linear blur can also be expanded  so only the edges are blurred or can be reduced so only a thin sliver is in focus.  The angle of the line can be changed, as well as moved anywhere in the image.  If you want a certain element in focus, you can also just tap the screen so that that part is included.  In the images below, you can see the two different types of blur.  The image of the landscape on the left uses the linear blur along the coastline, and the right image uses the circular blur around the skunk:

Old Saybrook & Backyard Visitor
     And on top of how the blur works, the filters work the same way.  They can be added before shooting the image or after, and with or without frame.  I do wish some of the filters were a little more editable, maybe with more contrast controls.  But that really is being picky... I can always re-edit the image in another editing ap, or load it to my computer and edit it in Photoshop.  By loading these into my computer, I found out something else that makes me very happy.  All of these images are at a quality that I can enlarge them and print them!  I sized the image all the way up to a 30 in x 30 in and there really was not too much damage to the image.  I see some new images being printed for my walls soon!  Especially the bridge on the right of the image below, which I snapped while coming home from Nantucket.  The one on the left was on the way to Nantucket because I had to show people that we did get snow in CT this December.

Snowy Drive & Bridge
    So who else out there loves Instagram?!  Send us some of your images, and we will post our favorites!  And follow me on Instagram... my handle is agattphoto!  (Stef's handle is sburnsphoto.)

Anne


"You don't take a photograph, you make it." - Ansel Adams


Wednesday, January 4, 2012

Macro Photography

Its a New Year, and I hope everyone had a great holiday!

Today, I want to discuss one of my favorite types of photography; Macro.  Whether you are using a macro lens on your DSLR, or are setting your point and shoot camera to Macro, it is a different way to shoot the world and the objects around you.  I tend to use it both in my personal and professional work.  While shooting weddings, I use macro to shoot close details of the bride's accessories. This is an image of the bride's necklace laid on her flowers:

Necklace Detail
Limited depth of field is an important consideration in macro photography.  A limited depth of field means that only the parts of an image in a particular focal plane will be in focus, which can make or break a composition.  This makes it essential to focus on the most important part of the subject, as parts of the subject that are even a millimeter closer or farther from the focal plane will be noticeably out of focus.   This can be seen in an image that I shot in college of water dripping out of a faucet, with a pack of highlighters behind it.  The highlighters are entirely out of focus so that they just become a hint of color, while the water is in clear focus:

Rainbow Water


If you are going to try this with your point and shoot or DSLR with a Macro lens here are a few tips to help:

- If you are shooting with a point and shoot, select Macro mode.  This is generally symbolized with a little flower.

- Using a tripod can be useful.  Keeping your camera still not only improves your shots (getting rid of camera shake), but it also allows you to play around with different settings without losing your composition.

- Using a timer can also help reduce camera shake, so that you do not have to touch the camera when triggering the shutter.


I would love to see some of your examples of macro photography! Please email me at Elegantedgephotography@gmail.com with your examples and I will post my favorites!

Stefanie


"I really believe there are things nobody would see if I didn't photograph them." - Diane Arbus